top of page
Patel Gaming Projects
Field Cannon
Time Duration: 06/03/2023 - 13/03/2023
This asset will simply just be used as a prop in field with no animations needed. No sketches are included with this design process.
Research
This show images of different cannon models based on the different types of ammunition that are used.


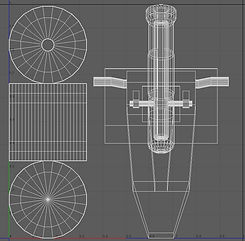
Modelling Process

1) First the cannon’s wheel, I extrude some of the faces of a cylinder shape back after deleting and rearranging some of the centre line cap position.
2) I created extrude the top and bottom side of a primitive cube object and I used the Boolean tool with another primitive cube object to slice part of the front part to for creating a window for the gun shield as well as rotate the top part of model by -15°.


3) Next, I had to create the cannon’s barrel by editing the measurements of both primitive cylinder and pipe models with the line and bridge tool before merging them.
4) I created the traveling forge from using a primitive cube that reshaped, before reediting the gun shield so I can merge both objects.


5) After mirroring the wheel model, I then had to reposition the subdivisions of another cylinder model to merge with the wheels and the cannon.
6) Then, I created the trunnions and holder by merging a primitive cylinder and another merged mirrored shape that I made by and mirroring it.

_JPG.jpg)
_JPG.jpg)
7) Finally before exporting the model, I merged every object in the scene together and edited the UV map to use for creating the materials maps later.
Creating Material Maps
I created the simple material maps with Photoshop.
1) I first merged a black square object to a grey background to create the Metallic map.


2) I reused the same method of creating the Metallic map, but with a darker grey background for the Albedo map.
3) Then, I used polygon tool to create hexagons with a gradient fill to create to nuts for the wheel, before merging the objects with a white icositetragon the layers, and using the generate normal map to create a normal map for the hub cap. Finally, I used the rectangle tool to create a set of black rectangles to merge with a white background, and reused the generate normal map but inverted the map to create the tire bump map and merge it with the other hub cap layer to compete the normal map before exporting the layers map.

bottom of page