
Patel Gaming Projects
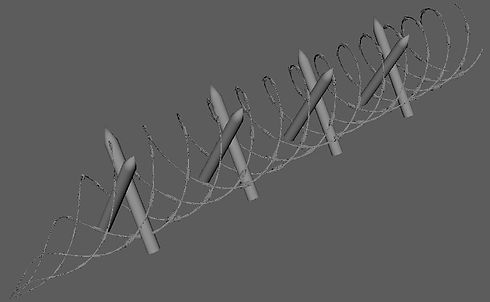
Barbed Wire
Time Duration: 27/02/2023 - 06/03/2023
The wire obstacle assets position will be placed in front of the sandbag wall that the player most dodge. This process will show no sketch work.
Research
I chose different barbed wire designs based on the material and model as well a method to make the wire look more twisted.


Modelling Process
1) I started by adding mirroring hexagon, 100 height and 0.126 radius with double subdivisions in height & no subdivisions for caps.


2) Next, I added a non-linear twist to the mirrored object to create the wire strands.
3) Before duplicating and rotating the helix object, I rotated and extruded the top & bottom faces and deleted some of the pivot points to create the sharp edges.


4) I then duplicated the object and repositioning the duplicated objects along the wire strands.1
5) I duplicated the wire twice and repositioned it on different sides from the model to merge it, before repositioning the faces at both sides.


6) Next, I mirrored and duplicated the wired object and added a non-linear twist and rescaled the full model by its width.
7) I duplicated an extruded cylinder a few times to create the posts for the wire strands before editing the UV Map.
_JPG.jpg)
_JPG.jpg)
_JPG.jpg)
_JPG.jpg)
8) Finally, I added a non-linear flare to different sides of the wire strands model to represent the end parts of the wire fence before saving them as separate models and export them.
Creating Material Maps
I chose to create the material maps on Photoshop.
1) I used the rectangle tool to create different coloured two rectangles before merging the layer to create the metallic map.
2) Next, I added a Motion Blur and a Uniform Noise to full brown coloured layer, before increased the size & adjusted the colour Levels mask of the layer, creating an overlay layer and merging the two layers with a sperate grey layer create with the rectangle tool for the Albedo Map.


3) I then duplicated the Albedo layer to add and adjusted the Black and White, Exposure and Brightness/Contrast masks to create a Height Map.4) Finally, I duplicated the Height Map layer to select a Generate Normal Map to create the normal map texture and exporting the material maps for my object.
4) Next, after duplicating the albedo map, I reused the Black & White, Exposure, Brightness/Contrast, and Generate Normal map to create the Normal map texture for my object.


